Fedora Remix for WSL 38 Released

Fedora 38.0.0:

  • Upgraded to Fedora 38

  • Upgraded to Mesa 23.0.2 with OpenGL 4.0 and GPU video decode

Upgrade Fedora Remix for WSL to 38

You can upgrade your existing installation of Fedora 37 with the following steps.

First, backup your installation:

wsl --export fedoraremix fedoraremix37_backup.tar.gz

Then proceed:

NOTE: DO NOT PERFORM THE UPGRADE STARTING FEDORA REMIX WITH SYSTEMD; IT WILL RUIN YOUR INSTALLATION

#Be sure that systemd is disabled
[ "$(grep -c "^systemd.*=.*true$" /etc/wsl.conf)" -ne 0 ] && sudo sed -i "s/^systemd.*=.*true$/systemd=false/" /etc/wsl.conf && wsl.exe --terminate ${WSL_DISTRO_NAME}

update.sh 
sudo dnf -y upgrade --refresh  
sudo dnf -y install dnf-plugin-system-upgrade  
sudo rpm --import https://src.fedoraproject.org/rpms/fedora-repos/raw/rawhide/f/RPM-GPG-KEY-fedora-38-primary  
sudo dnf -y install distribution-gpg-keys 
sudo dnf -y system-upgrade --allowerasing --skip-broken download --releasever=38  
sudo dnf -y system-upgrade reboot

At this point, it will raise an error, ignore it, and execute the following commands:

sudo dnf -y system-upgrade upgrade   
sudo dnf -y autoremove   
sudo dnf -y clean all   
sudo mandb  
update.sh  
cat /etc/fedora-release
exit

You can then reenable or start with SystemD if you were using it.

Enjoy it!

Announcing built-in SystemD support in Pengwin Enterprise

SystemD is not supported officially in WSL and the lack of it imposes the following limits:

  • Services cannot be started using the familiar systemctl and the daemons must be started manually.

  • For RedHat and SUSE like distros, neither the service command can be used to start services.

  • Use snaps

  • Run Gnome desktop

Pengwin Enterprise 7.9.1 and 8.6.1 include SystemD support

Traditionally bringing SystemD to WSL implied using workarounds or scripts to be able to start the systemd daemon with a process id 0. We based our implementation on one of them, the one-script-wsl2-systemd by Dani Llewellyn. Upon updating to 7.9.1 or 8.6.1 versions, you’ll see the following changes:

  • A new start menu entry called Pengwin Enterprise 7/8 (SystemD)


  • A new menu entry in Windows Terminal


  • New options for run at Windows login


Starting SystemD

The SystemD support is entirely optional, and you can start it or not, depending on what you need to do. You can use the Start Menu shortcut, the Windows Terminal profile, via command line, execute: wle -s / pengwinenterprise8 -s, or inside a running instance sudo start-systemd

NOTE: You don’t need to wipe your actual installation; when you start SystemD for the first time, it will update everything for you into your existing instance.

Some examples

Ok, I have SystemD; now what? Let’s see some helpful use cases:

The SSH server is started automatically

First, install prerequisites sudo yum -y install iproute openssh-server openssh-clients

And enable ssh sudo systemctl enable --now sshd

Let’s get the IP address with ip address show dev eth0

And ssh into it

Sadly the WSL2 IP address changes on every restart. Let’s use hostnames instead:

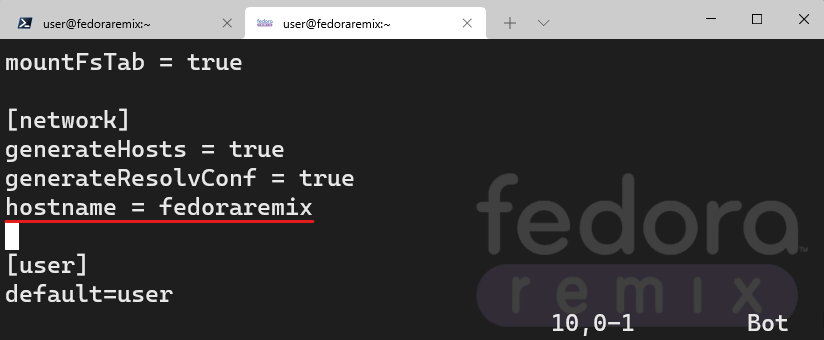
  • Edit the /etc/wsl.conf to establish a custom hostname. Add a hostname entry in the [network] section with the hostname that you like

  • Install avahi with sudo yum -y install avahi and enable it with sudo systemctl enable --now avahi-daemon

  • Terminate Pengwin Enterprise (wsl.exe --terminate pengwinenterprise8 or wle) and start it again with SystemD.

  • Now connect using ssh but using the hostname.

  • In RHEL you may also need to open the port in Firewall: sudo firewall-cmd --permanent --add-port=5353/udp and sudo firewall-cmd --reload

Install GNOME desktop

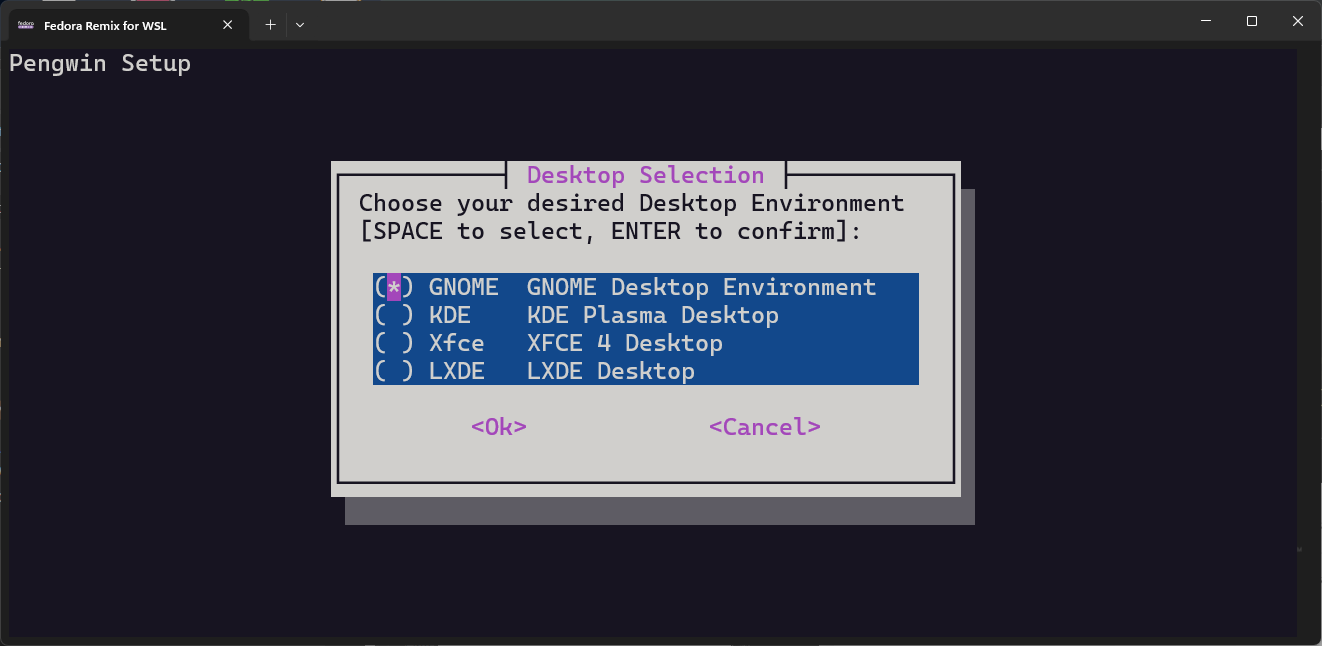
Let’s level it up and install a full desktop. First, edit the /etc/wsl.conf to establish a custom hostname. Add a hostname entry in the [network] section with the hostname that you like as we did in the previous example:

Now install Gnome using:

  • Pengwin Enterprise 8: sudo yum group install -y Workstation

  • Pengwin Enterprise 7: sudo yum group install 'GNOME Desktop'

  • RHEL7: sudo yum group install 'Server with GUI'

When it finishes, you’ll need to configure the locale with localectl set-locale LANG="en_US.UTF-8"
The last step is to install the remote desktop support xrdp

  • First, install the EPEL repository: sudo yum -y install epel-release or sudo yum install -y https://dl.fedoraproject.org/pub/epel/epel-release-latest-8.noarch.rpm for RHEL

  • Then XRDP: sudo yum -y install tigervnc-server xrdp and enable it with sudo systemctl enable --now xrdp

  • In RHEL you may also need to open the port in Firewall: sudo firewall-cmd --permanent --add-port=3389/tcp and sudo firewall-cmd --reload

  • Terminate Pengwin Enterprise (wsl.exe --terminate pengwinenterprise8 or wle) and start it again with SystemD

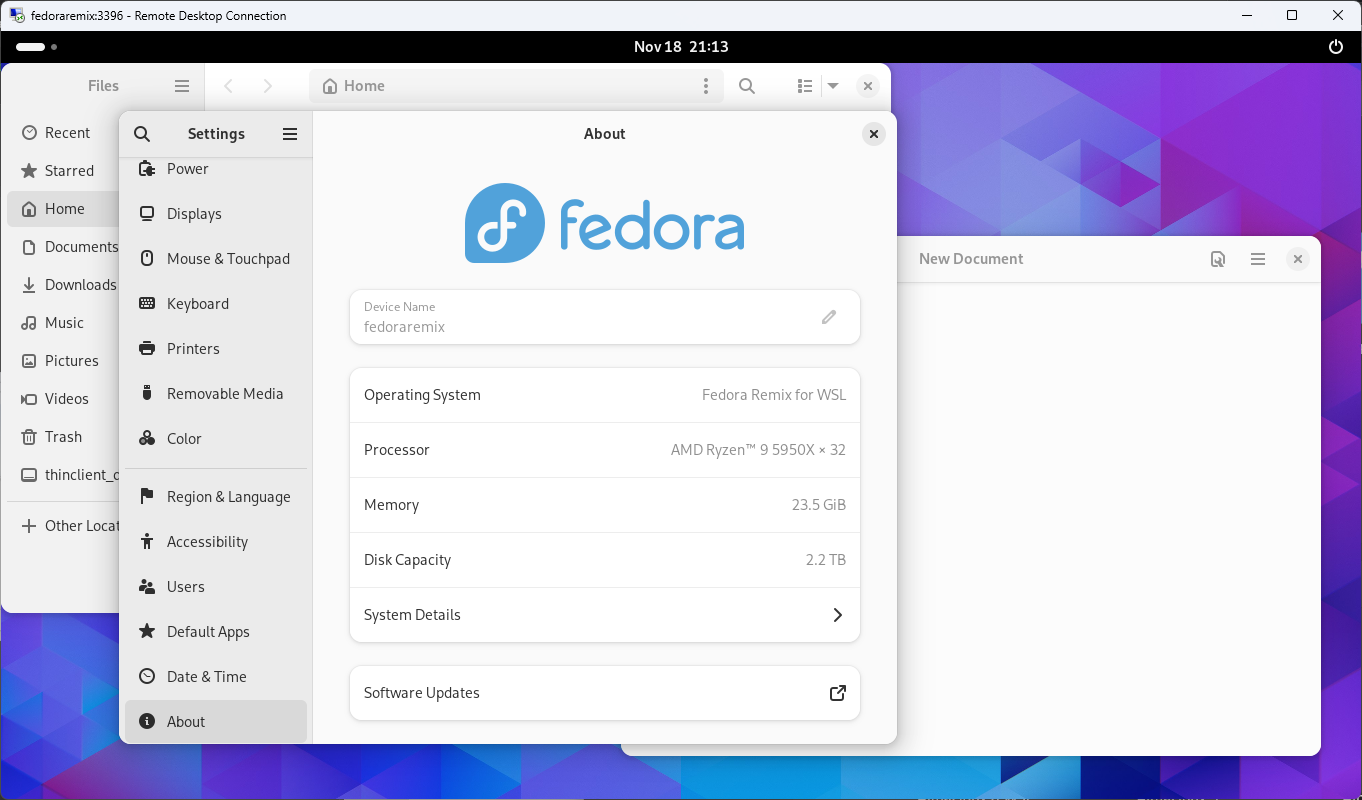
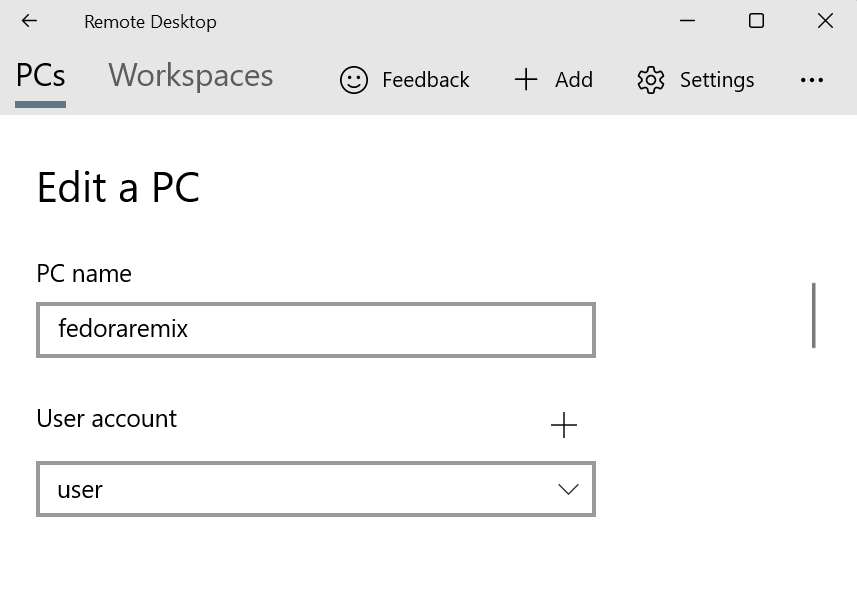
Now open the Remote Desktop Connection or Remote Desktop app from the store (recommended) and put the hostname you defined in the Computer or PC name field. Also, you can specify the username and if you want it to save the password

And here is

Install and run Snaps

Once you started with SystemD, you can install SnapD using the standard steps for RHEL:

  • Create the symbolic link for the classic mode: sudo ln -s /var/lib/snapd/snap /snap

  • Check if everything is ok with snap version

  • Install an example snap: sudo snap install hello-world

  • And run it: snap run hello-world

Installing a snap with GUI suppport

What about a graphical application? Let’s try with IntelliJ IDEA. sudo snap install intellij-idea-community --classic

Note for Windows 11 users. GUI support with snaps is not currently supported on WSLg in Pengwin Enterprise 7-8. You’ll need to disable WSLg editing winhome/.wslconfig, /etc/wsl.conf or creating a startup file (recommended) with: echo 'unset DISPLAY' | sudo tee /etc/profile.d/00-nowslg.sh and use the traditional methods used in Windows 10 installing an X Server like VcXSrv or X410, Pengwin Enterprise will be configured automatically to use it.

Windows 10, you’ll need a running X Server in Windows such as X410 or VcXsrv.

IntelliJ IDEA installed as a snap in Pengwin Enterprise

Note that for Windows 10, you’ll need a running X Server in Windows, such as X410 or VcXsrv

Starting your services at Windows log-in

You can instruct Pengwin Enterprise to run at Windows startup with SystemD, thus starting your services. Just go to the App Settings and activate the preferred option. The No Window option won’t show any console upon start.


Starting services in Pengwin Enterprise without using SystemD, also available for WSL1

Many services like SSH, Avahi, and XRDP don’t require SystemD in order to be run. But starting them manually can be tedious. This is why this update to Pengwin Enterprise includes a script that can be used to start services using the systemctl syntax. We called it wslsystemctl and it is based on a solution made to start services in a docker container in an easy way. For more information on the source check: Docker SystemD Replacement

Starting SSH

  • Run sudo wslsystemctl start sshd-keygen@ecdsa.service (sudo wslsystemctl start sshd-keygen in Pengwin Enterprise 7) only the first time to generate the key.

  • Run sudo wslsystemctl start sshd

Starting your services at Pengwin Enterprise start without SystemD

You can add the command sudo wslsystemctl default to your .bashrc so your services will be started.

echo "%wheel ALL=NOPASSWD: /usr/bin/wslsystemctl default" | sudo EDITOR="visudo" tee /etc/sudoers.d/start-services
echo "sudo wslsystemctl default 2>/dev/null">> $HOME/.bashrc

Known issues

The SystemD integration is a work in progress; some things don’t run well or are incompatible. Our piece of advice is that use SystemD only when you need it. Let’s see some of them and workarounds.

WSL Store edition

You may experience crashes or wsl shutdowns when using Remote Desktop, and a desktop environment served via XRDP. Also, the interoperability between WSL and Windows begins to fail. The advice is if you experience stability problems, uninstall the Store version.

WSLg

Out of the box, GUI applications won’t work in WSLg if Pengwin Enterprise is started with SystemD; we are still working on that. The situation is worse if the application is packed as a snap. Some workarounds:

  • The best way is to bypass WSLg entirely and use an X Server in Windows as we do in Windows 10. With the following command, WSLg will be disabled just for Pengwin Enterprise: echo "unset DISPLAY" | sudo tee /etc/profile.d/00-nowslg.sh

  • Another way is to use Wayland instead of XWayland; it won’t work with snaps unless the Wayland plugin is packed into the snap. For it, we need to install the Wayland plugin and define some environment variables.
 
sudo yum -y install qt5-qtwayland 
export QT_QPA_PLATFORM=wayland 
export XDG_RUNTIME_DIR=/mnt/wslg/runtime-dir
  • if you installed any desktop environment like the previous examples, the GUI applications would run perfectly inside.

Start menu shortcuts won’t be generated for snap applications

We are working to bring an alternative for this because SystemD must be started before trying to use the snaped application.

Acknowledgments 

🏆 Dani Llewellyn - for her hard work making it possible to have SystemD and Snaps together with WSLg with a single and easy-to-use script.

🏆 Guido U. Draheim - for creating a script that allows WSL users to start services without having to start SystemD, also helping WSL1 users.

🏆 carrizo - for integrating both scripts into the image and the update.sh script, and making it possible to call them transparently from the launcher.

Conclusion

There is still work to do, but we want to know what you do with it; please share your impressions and use cases in the comments.

Enjoy it!!

Announcing built-in SystemD support in Fedora Remix for WSL

SystemD is not supported officially in WSL and the lack of it imposes the following limits:

  • Services cannot be started using the familiar systemctl and the daemons must be started manually.

  • For RedHat and SUSE like distros, neither the service command can be used to start services.

  • Use snaps

  • Run Gnome desktop

Fedora Remix WSL 35.13.5 includes SystemD support

Traditionally bringing SystemD to WSL implied using workarounds or scripts to be able to start the systemd daemon with a process id 0. We based our implementation on one of them, the one-script-wsl2-systemd by Dani Llewellyn. Upon updating to the 35.13.5 version you’ll see the following changes:

  • A new start menu entry called Fedora Remix for WSL


  • A new menu entry in Windows Terminal


  • New options for run at Windows login


Starting SystemD

The SystemD support is completely optional and you can start it or not depending on what you need to do. You can use Start Menu shortcut, the Windows Terminal profile, via command line execute: fedoraremix -s, or inside a running instance sudo start-systemd

NOTE: You don’t need to wipe your actual installation, when you start SystemD for the first time it will update and everything for you into your existing instance.

Some examples

Ok, I have SystemD, now what? Let’s see some useful use cases:

The SSH server is started automatically

First, let’s get the IP address with ip address show dev eth0

And ssh into it

Sadly the WSL2 IP address changes on every restart. Let’s use hostnames instead:

  • Edit the /etc/wsl.conf to establish a custom hostname. Add a hostname entry in the [network] section with the hostname that you like

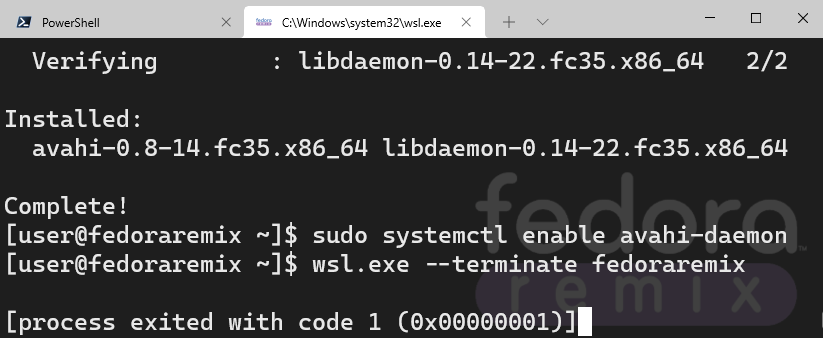
  • Install avahi with sudo dnf -y install avahi and enable it with sudo systemctl enable avahi-daemon

  • Stop Fedora Remix with wsl.exe --terminate fedoraremix

  • Start it again with SystemD.

  • Now connect using ssh but using the hostname


Install GNOME desktop

Let’s level it up and install a full desktop. First, edit the /etc/wsl.conf to establish a custom hostname. Add a hostname entry in the [network] section with the hostname that you like as we did in the previous example:

Now install Gnome using sudo dnf -y groupinstall 'Basic Desktop' GNOME. You can use also the Fedora Workstation group but it will install many things that probably you won’t need.

When it finish you’ll need to configure the locale with: localectl set-locale LANG="en_US.UTF-8"
The last step is to install the remote desktop support xrdp: sudo dnf -y install xrdp and enable it with sudo systemctl enable xrdp
Terminate fedoraremix and start it again with SystemD

If the terminate command fails, run it from PowerShell. Start Fedora Remix again with SystemD

Now open Remote Desktop Connection or Remote Desktop app from the store (recommended) and put the hostname that you defined in the Computer or PC name field. Also you can specify the username and if you want it to save the password

And here is

Install and run Snaps

Once you started with SystemD, you can install SnapD using the standard steps for Fedora:

  • Be sure that you started Fedora Remix with SystemD.

  • Run: sudo dnf -y install snapd

  • Create the symbolic link for the classic mode: sudo ln -s /var/lib/snapd/snap /snap

  • Check if everything is ok with: snap version

  • Install an example snap: sudo snap install hello-world

  • And run it: hello-world

If you see a bash: hello-world: command not found... start Fedora Remix again in SystemD mode

Installing a snap with GUI suppport

What about a graphical application? Let’s try with IntelliJ IDEA. sudo snap install intellij-idea-community --classic

IntelliJ IDEA installed as a snap in Fedora Remix for WSL

Note that for Windows 10 you’ll need a running X Server in Windows such as X410 or VcXsrv

Starting your services at Windows log-in

You can instruct Fedora Remix to run at Windows startup with SystemD thus starting your services. Just go to the App Settings and activate the preferred option. The No Window option won’t show any console upon start.


Starting services in Fedora Remix for WSL without using SystemD, also available for WSL1

Many services like SSH, Avahi, and XRDP don’t require SystemD in order to be run. But starting them manually can be tedious. This is why this update to Fedora Remix includes a script that can be used to start services using the systemctl syntax. We called it wslsystemctl and it is based on a solution made to start services in a docker container in an easy way. For more information on the source check: Docker SystemD Replacement

Starting SSH

  • Run sudo wslsystemctl start sshd-keygen@ecdsa.service only the first time to generate the key

  • Run sudo wslsystemctl start sshd

Starting your services at Fedora Remix start without SystemD

You can add the command sudo wslsystemctl default to your .bashrc so your services will be started.

echo "%wheel ALL=NOPASSWD: /usr/local/bin/wslsystemctl default" | sudo EDITOR="visudo" tee /etc/sudoers.d/start-services echo "sudo wslsystemctl default 2>/dev/null">> $HOME/.bashrc

Known issues

The SystemD integration is a work in progress and some things don’t run well or are incompatible. Our piece of advice is that use SystemD only when you really need it. Let’s see some of them and workarounds.

WSL Store edition

You may experience crashes or wsl shutdowns when using Remote Desktop and a desktop environment served via XRDP. Also, the interoperability between WSL and Windows begins to fail. The advice is if you experience stability problems uninstall the Store version.

WSLg and Qt applications

Out of the box, Qt applications will be rendered as black boxes in WSLg if Fedora Remix is started with SystemD, we are still working on that. The situation is worse if the application is packed as a snap. Some workarounds:

  • The best way is to bypass WSLg completely and use an X Server in Windows as we do in Windows 10. With the following command, WSLg will be disabled just for Fedora Remix: echo "unset DISPLAY" | sudo tee /etc/profile.d/00-no-wslg.sh

  • Another way is to use Wayland instead of XWayland; it won’t work with snaps unless the Wayland plugin is packed into the snap itself. For it, we need to install the Wayland plugin and define some environment variables

 
sudo dnf -y install qt5-qtwayland
export QT_QPA_PLATFORM=wayland
export XDG_RUNTIME_DIR=/mnt/wslg/runtime-dir
  • if you installed any desktop environment like in the previous examples, the Qt applications will run perfectly inside of it.

Start menu shortcuts won’t be generated for snap applications

We are working to bring an alternative for this, because SystemD must be started before trying to use the snaped application.

Acknowledgments 

🏆 Dani Llewellyn - for her hard work making it possible to have SystemD and Snaps together with WSLg with a single and easy-to-use script.

🏆 Guido U. Draheim - for creating a script that allows WSL users to start services without having to start SystemD, also helping WSL1 users.

🏆 carrizo - for integrating both scripts into the image and the update.sh script, and making it possible to call them transparently from the launcher.

Conclusion

There is still work to do but we want to know what you do with it, please share your impressions and use cases in the comments.

Enjoy it!!

Upgrade Fedora Remix for WSL to 35

Hello,

Today November 2, Fedora 35 was released

You can upgrade your existing installation of Fedora 34 with the following steps.

First, if you are in Windows 1903 or newer first backup your installation:

wsl --export fedoraremix fedoraremix34_backup.tar.gz

Then proceed:

upgrade.sh
sudo dnf upgrade --refresh
sudo dnf install dnf-plugin-system-upgrade
sudo rpm --import https://src.fedoraproject.org/rpms/fedora-repos/blob/rawhide/f/RPM-GPG-KEY-fedora-35-primary
sudo dnf install distribution-gpg-keys
sudo dnf system-upgrade --allowerasing --skip-broken download --releasever=35
sudo dnf system-upgrade reboot

At this point, it will raise an error, ignore it, and execute the following commands:

sudo dnf system-upgrade upgrade
sudo dnf -y autoremove
sudo dnf -y clean all
sudo mandb
upgrade.sh
cat /etc/fedora-release

exit

For Windows 11

If you have Windows 11, you can use WSLg in Fedora Remix. Let’s follow some steps so you can squeeze the best of this technology.

Tune Fedora Remix for WSL

Enable D-Bus

Many Linux apps rely on D-Bus to work properly. This support is installed in Fedora Remix for WSL running:

sudo dnf install dbus dbus-x11

Install your beloved GUI app using dnf, for example:

sudo dnf install terminator

It will create a Start Menu shortcut for it called in this case Terminator (fedoraremix)

Enjoy it!

Upgrade Fedora Remix for WSL to 34

Hello,

Today April 27, Fedora 34 was released: Fedora Linux 34 is officially here! - Fedora Magazine.

You can upgrade your existing installation of Fedora 33 with the following steps.

First, if you are in Windows 1903 or newer first backup your installation:

wsl --export fedoraremix fedoraremix33_backup.tar.gz

Then proceed:

upgrade.sh
sudo dnf upgrade --refresh
sudo dnf install dnf-plugin-system-upgrade
sudo rpm --import https://src.fedoraproject.org/rpms/fedora-repos/blob/rawhide/f/RPM-GPG-KEY-fedora-34-primary
sudo dnf install distribution-gpg-keys
sudo dnf system-upgrade --allowerasing --skip-broken download --releasever=34
sudo dnf system-upgrade reboot

At this point, it will raise an error, ignore it, and execute the following commands:

sudo dnf system-upgrade upgrade
sudo dnf -y autoremove
sudo dnf -y clean all
sudo mandb
upgrade.sh
cat /etc/fedora-release

exit

For Windows Insider Preview Build 21362+

If you have the latest insider version, you can use WSLg in Fedora Remix. Let’s follow some steps so you can squeeze the best of this technology.

WSLg installation

Once you have upgraded your Windows Insider to at least build 21362, you will need to upgrade your WSL installation.

  1. Be sure that Fedora Remix for WSL is already running in WSL 2. If not, first switch it with wsl --set-version fedoraremix 2. Then run wsl --shutdown

  2. Upgrade WSL running wsl --update from an elevated command prompt or PowerShell. And restart WSL with wsl --shutdown.

Installing the graphic driver in Windows

It recommended running WSLg on a system with virtual GPU (vGPU) enabled for WSL so you can benefit from hardware-accelerated OpenGL rendering. You can find a preview driver supporting WSL from each of our partners below.

For more information: GitHub - microsoft/wslg: Enabling the Windows Subsystem for Linux to include support for Wayland and X server related scenarios

Tune Fedora Remix for WSL

Upgrade Fedora Remix for WSL

After enabling WSLg support you will need to run the upgrade script again in order to have installed the accelerated GPU support:

upgrade.sh

Enable D-Bus

Many Linux apps rely on D-Bus to work properly. This support is installed in Fedora Remix for WSL running:

sudo dnf install dbus dbus-x11

Install your beloved GUI app using dnf, for example:

sudo dnf install terminator

It will create a Start Menu shortcut for it called in this case Terminator (fedoraremix)

Enjoy it!

Place your Java project in Pengwin WSL2 and use IntelliJ 2021 to build and run it

Recently JetBrains shipped the IntelliJ 2021.1 Beta 3 with an interesting addition; the possibility to compile and run Java programs whose source code is in WSL2. Everything from the Windows version of the IDE.

https://blog.jetbrains.com/idea/2021/01/intellij-idea-2021-1-eap-1/

https://blog.jetbrains.com/idea/2021/02/intellij-idea-2021-1-eap-5/

Let's create a new Java project (Gradle / Maven) inside Pengwin and run it using IntelliJ from Windows

Install Java in Pengwin

Let's prepare Pengwin for run Java project from IntelliJ:

  1. Install SDK Man from pengwin-setup. SDK Man is a very versatile distribution manager, where you can install and update not only any supported Java version but also Ant, Gradle, Maven, and many other tools. (https://sdkman.io/sdks)

    $ pengwin-setup update $ pengwin-setup install PROGRAMMING JAVA $ source /etc/profile.d/sdkman.sh

  2. List the JVM available and install one of them or simply install the default one.

    $ sdk list java $ sdk install java 11.0.3.hs-adpt # For example

Or the default

$ sdk install java

Create a new project in IntelliJ

  1. Create a new Java project. You can choose Java, Gradle, or Maven.
  2. Choose the just installed JDK from the drop-down
  1. Remember to create the project in Pengwin home: \\wsl$\WLinux\home\user
  1. Now refresh the Gradle project (or maven) in IntelliJ and you are ready to start coding, at the IO speed of Linux on Windows:

Additional instructions for Maven

Maven needs some more tweaks:

  1. If you haven't installed java from apt, create a symbolic link from the default path
    $ sudo ln -s "$(which java)" /usr/bin/java    
    $ sudo ln -s "$(which javac)" /usr/bin/javac
  2. Install Maven using SDKMAN
    $ sdk install maven

Permission problems

Sometimes IntelliJ creates the project and its own cache directory as root, and then itself fails due to permission problems. To fix that execute:

$ cd
$ sudo chown user:user -R .cache # Replace 'user' by your username
$ sudo chown user:user -R untitled # Replace 'user' by your username and 'untitled' by your project folder

Run Oracle Linux on WSL with Pengwin Enterprise (Updated 23-02-2021)

Pengwin Enterprise supports several enterprise Linux distributions, including Oracle Linux. You can upgrade to Oracle Linux completely free, no strings attached, using a handy script provided by Oracle. This is the exact same Oracle Linux that Oracle provides to its enterprise customers. And it ‘just works’ on the personal use demo build of Pengwin Enterprise built with Scientific Linux in the Microsoft Store.

101e08a1-58fa-4470-b85c-a4f89c8b802c.png
{1FEE154C-C58C-43B4-A06D-3097CDFA05C3}.png.jpg
{0A941B3E-4934-4DB5-8BDE-2852281A1B3F}.png.jpg

2.

Set a password for root and create a default non-privileged user. 

{2C760724-63F4-4D99-82CE-5C1BE700BB27}.png.jpg

3.

Change to root:

$ su -
{53623AF7-D003-46A1-9A16-56DF17962B38}.png.jpg

4.

Download and run Oracle's script: 

# curl https://raw.githubusercontent.com/oracle/centos2ol/main/centos2ol.sh | bash

That’s it.

If you are in WSL1 remove sudo due to it halts the distribution. Use su -c or su - instead.

# yum remove sudo -y

Bonus:

Install wslutilities

# yum install wslu -y
{99D2A3B5-BE21-489B-92D3-2058CCB19D07}.png.jpg

See more on Oracle Linux.

Oracle Linux has not endorsed Pengwin Enterprise.

Upgrade Fedora Remix for WSL to 33

Hello,

You can upgrade your existing installation of Fedora 32 with the following steps.

First, if you are in Windows 1903 or newer first backup your installation:

wsl --export fedoraremix fedoraremix32_backup.tar.gz

Then proceed:

upgrade.sh
sudo dnf upgrade --refresh
sudo dnf install dnf-plugin-system-upgrade
sudo rpm --import https://src.fedoraproject.org/rpms/fedora-repos/blob/rawhide/f/RPM-GPG-KEY-fedora-33-primary
sudo dnf install distribution-gpg-keys
sudo dnf system-upgrade --allowerasing --skip-broken download --releasever=33
sudo dnf system-upgrade reboot

At this point, it will raise an error, ignore it, and execute the following commands:

sudo dnf system-upgrade upgrade
sudo rpm --rebuilddb
sudo dnf -y autoremove
sudo dnf -y clean all
sudo mandb
upgrade.sh
cat /etc/fedora-release

exit

If you face an error like: "Failed to obtain the transaction lock (logged in as root).". Run this:

upgrade.sh

And repeat the last command that you attempted and keep following the steps.

Upgrade Fedora Remix for WSL to 32

Hello,

You can upgrade your existing installation of Fedora 31 with the following steps. To do a fresh install just run wsl --unregister fedoraremix and run fedoraremix.exe again:

First, if you are in Windows 1903 or newer first backup your installation:

wsl --export fedoraremix fedoraremix31_backup.tar.gz

Then proceed:

upgrade.sh
sudo dnf upgrade --refresh
sudo dnf install dnf-plugin-system-upgrade
sudo dnf system-upgrade --allowerasing --skip-broken download --releasever=32
sudo dnf system-upgrade reboot

At this point, it will raise an error, ignore it, and execute the following commands:

sudo dnf system-upgrade upgrade
sudo dnf -y autoremove
sudo dnf -y clean all
sudo mandb
cat /etc/fedora-release
exit

If you face an error like: "Failed to obtain the transaction lock (logged in as root).". Run this:

upgrade.sh

And repeat the last command that you attempted and keep following the steps.

Installing MATE in Fedora Remix for WSL

These instructions assume that you have just installed Fedora Remix, and the users have been created.

Install MATE

sudo dnf -y update 
sudo dnf -y group install "mate-desktop" --skip-broken

Setting up dbus daemon

echo -e '\neval "$(timeout 2s dbus-launch --auto-syntax)"'>>~/.bashrc 
source ~/.bashrc

Running MATE

Run your preferred server in desktop mode. In the case of X410: x410.exe /desktop

8d9c3ce3-8b89-45dd-ba7d-6cd9390a04d7.png
mate-session
39e9982b-af03-4712-84de-13081a0705ba.png